Search This Blog

Wednesday, February 02, 2011

Add a number to a variable in shell script

Consider the following shell script
$cat add_variables_02.sh
#! /bin/sh
ov=10;
nv=$((ov+3)); echo $nv
((nv=ov+3)); echo $nv
nv=$ov+3; echo $nv
nv=`expr $ov+3`; echo $nv
nv=`expr $ov + 3`; echo $nv
Execute in a shell
$bash add_variables_02.sh 
13
13
10+3
10+3
13
The first two methods nv=$((ov+3)) or ((nv=ov+3)) are faster than the fifth method nv=`expr $ov + 3` as the former uses bash's own feature and the later runs an external command in a subprocess.

Also, note that spaces are needed before and after the '+' character when expr is used.

Tested in Debian Wheezy machine using bash 4.2-1

Further reading
  1. info coreutils 'expr invocation'
  2. man expr

Special thanks to the anon 2011-08-24 5:06 AM for providing the first two methods.

Saturday, August 21, 2010

recover an accidentally overwritten partition table

shorter version:

Q. I accidentally overwrote the partition table on my computer. Now it does not boot. Is there any way to restore it back?
A. use the testdisk program. Debian users can install it by doing

# apt-get install testdisk

To run it, use the command

# testdisk

This tool is very powerful, easy to use and interactive. It can be run from a live CD. I used it to recover the ext3, Linux swap partition information.


Long story:

My favorite tool for partitioning is qtparted. I got hooked to it couple of years back when I was trying out a knoppix live CD.

The hard drive of my laptop is /dev/sda. I recently bought a 500 GB external USB hard drive. When I connected the USB hard drive, it was recognized as /dev/sdb. I used the qtparted program to partition the /dev/sdb.


The partitioning process went smoothly. But when I click on the /dev/sdb link in the left tab of qtparted window, there were error messages on my konsole

$sudo qtparted
No Implementation: Support for opening ntfs file systems is not implemented yet.
Error: File system has an incompatible feature enabled. Compatible features are has_journal, dir_index, filetype, sparse_super and large_file. Use tune2fs or debugfs to remove features.

Not sure of what it means, I resorted to cfdisk (a Curses based tool for partitioning).


My intention was to delete all the partitions on /dev/sdb and start afresh. However, I ended up deleting all the ext3, swap partitions on /dev/sda by accident. Notice how cfdisk only lists /dev/sda and nothing about /dev/sdb?

When the changes are committed, it gave an error. It asked me to reboot the machine in order to fix the error.

When the laptop is rebooted, Grub does not load. IIRC, the error code was 17. My computer is now officially in a half baked state with the wrong partition table (all because of my stupidity).

Kumar Appiah suggested me to try testdisk. He used it before to recover some FAT32, NTFS partitions.

So, I popped in an old Ubuntu (hoary) live CD to see if it has testdisk. It does not. The Hoary was released a while back. The official repositories were removed. So a simple

# sudo apt-get update

did not work. I modifed the /etc/apt/sources.list to point to dapper instead of hoary. Then did an apt-get update, apt-get install testdisk.

In order to install testdisk from dapper onto hoary, apt-get wanted to install a new kernal and remove the current kernel. I let the upgrade process run and gave it a 'no' when it wanted to remove the current kernel during the post configure stage. This exited the apt-get process abruptly.

Then, I did a "sudo apt-get -f install" to fix the inconsistent state. I then had to do another "sudo apt-get install testdisk". This time it proceeded without any difficulty.

Once testdisk is installed in the RAM, running it was easy. Just execute

# testdisk

The instructions in testdisk screens are very clear. At the end, I was able to recover my original partition table. Kudos to the authors, Debian maintainers of testdisk and to Kumar for suggesting it.


Useful links:
. websites of testdisk , qtparted
. links to debian packages testdisk, qtparted, e2fsprogs

Tuesday, June 15, 2010

options in function variables octave

The following octave code shows how to make functions take different paths depending on a user specified choice. It is a little template that comes in handy once in a while.
$cat options_in_function_variables_01.m
# Author : Kamaraju S. Kusumanchi
# Email : kamaraju at gmail dot com
# Last modified : Tue Jun 15 06:45:15 EDT 2010
function [X] = options_in_function_variables_01(X, choice)

if (strcmp(choice, "square"))
X = X*X;
elseif (strcmp(choice, "unity"))
X = X*1;
elseif (strcmp(choice, "cube"))
X = X*X*X;
else
printf("choice = %s is not a valid option.\n", choice);
error("please provide a correct choice");
endif
endfunction

To test it

$octave -qf
octave:1> options_in_function_variables_01(2.2, 'unity')
ans = 2.2000
octave:2> options_in_function_variables_01(2.2, 'square')
ans = 4.8400
octave:3> options_in_function_variables_01(2.2, 'cube')
ans = 10.648
octave:4> 10.648/4.84
ans = 2.2000
octave:5> 4.84/2.2
ans = 2.2000

Monday, May 17, 2010

passing functions as arguments in octave

It is possible to pass functions as arguments to another function in Octave. Consider the following sample code

$ls
cube.m dynamic.m script.m square.m

$cat square.m
function [sq] = square(x)
sq = x**2;
endfunction

$cat cube.m
function [cu] = cube(x)
cu = x**3;
endfunction

$cat dynamic.m
function [ ret ] = dynamic (fh, x)
# fh is a function name passed as a string
# ex:- b = dynamic("cube", a);
# fh can also be a handle
# handle = @square;
# b = dynamic(handle, a);
ret = feval(fh, x);
endfunction

$cat script.m
a=5.0

# bh = b obtained by using handle as arguments
handle=@square;
bh = dynamic( handle, a)

# bs = b obtained by using strings as arguments
bs = dynamic("square", a)

# ch = c obtained by using handle as arguments
handle=@cube;
ch = dynamic( handle, a)

# cs = c obtained by using strings as arguments
cs = dynamic("cube", a)


Run the script.m in octave

$octave3.2 -qf script.m

a = 5
bh = 25
bs = 25
ch = 125
cs = 125

Tested using Debian Lenny (stable), Octave 3.2.4

Further Reading:
1) The section on "Function handles, Inline Functions, and Anonymous Functions" in the octave manual http://www.gnu.org/software/octave/doc/interpreter/Function-Handles-Inline-Functions-and-Anonymous-Functions.html

2) http://rosettacode.org/wiki/Higher-order_functions explains how to do this kind of "calling functions from functions" in various programming languages

Sunday, April 25, 2010

load data file with header lines in octave

When a data file contains some header lines before the actual data matrix, octave's dlmread function can be used to read the matrix of data and ignore the headers.

For example,

$cat input_data.m
col1 col2 col3
1, 2, 3
4, 5, 6
7, 8, 9
10, 11, 12

This file contains one header line and a 4x3 data matrix. To read it into octave, create a script called

$cat read_data.m
1;
A = dlmread("input_data.m", SEP=',', R0=1, C0=0);
A

$octave3.2 -qf
octave3.2:1> read_data
A =

1 2 3
4 5 6
7 8 9
10 11 12


For more information on dlmread function, use 'help dlmread' inside octave.

Tested using octave 3.2.4-3 on Debian stable (Lenny).

Wednesday, September 09, 2009

print a file by line numbers

Consider the file

$ cat name.txt
1 k
2 ka
3 kam
4 kama
5 kamar
6 kamara
7 kamaraj
8 kamaraju
9 kamaraju
10 kamaraju k
11 kamaraju ku
12 kamaraju kus
13 kamaraju kusu
14 kamaraju kusum
15 kamaraju kusuma
16 kamaraju kusuman
17 kamaraju kusumanc
18 kamaraju kusumanch
19 kamaraju kusumanchi

To print the contents of lines between 5 and 8

$ sed -n '5,8p' name.txt
5 kamar
6 kamara
7 kamaraj
8 kamaraju

$echo $?
0

To print the lines 10 to 20, just do

$ sed -n '10,20p' name.txt
10 kamaraju k
11 kamaraju ku
12 kamaraju kus
13 kamaraju kusu
14 kamaraju kusum
15 kamaraju kusuma
16 kamaraju kusuman
17 kamaraju kusumanc
18 kamaraju kusumanch
19 kamaraju kusumanchi

$echo $?
0

Note that this command is successful even though the specified right limit (20) is greater than the number of lines in the file (19).

To print the nth line of a file (w.l.g. say n=8), just do

$ sed -n 8p name.txt
8 kamaraju

$ echo $?
0

End of line is represented by $. So, to print from 17th line till the end of the file, do

$ sed -n '17,$p' name.txt
17 kamaraju kusumanc
18 kamaraju kusumanch
19 kamaraju kusumanchi

$ echo $?
0

tags | print specific lines in a file

Saturday, June 20, 2009

No theme index file.dpkg error

While trying to upgrade to texmacs 1:1.0.7.2-1in Sid (unstable) on a machine running Debian Lenny (Stable), I was getting the following error

$sudo apt-get install texmacs
// bunch of apt-get messages

Setting up texmacs-common (1:1.0.7.2-1) ...
gtk-update-icon-cache: No theme index file.dpkg: error processing texmacs-common (--configure):
subprocess post-installation script returned error exit status 1
dpkg: dependency problems prevent configuration of texmacs:
texmacs depends on texmacs-common (= 1:1.0.7.2-1); however:
Package texmacs-common is not configured yet.
dpkg: error processing texmacs (--configure):
dependency problems - leaving unconfigured
Errors were encountered while processing:
texmacs-common
texmacs
E: Sub-process /usr/bin/dpkg returned an error code (1)


Install the gnome-icon-theme package to solve this bug.
$sudo apt-get install -t stable gnome-icon-theme
//bunch of apt-get messages

Selecting previously deselected package gnome-icon-theme.
(Reading database ... 225097 files and directories currently installed.)
Unpacking gnome-icon-theme (from .../gnome-icon-theme_2.22.0-1_all.deb) ...
Setting up texmacs-common (1:1.0.7.2-1) ...
gtk-update-icon-cache: Cache file created successfully.
Setting up texmacs (1:1.0.7.2-1) ...
Setting up gnome-icon-theme (2.22.0-1) ...

Thursday, June 04, 2009

running external commands

  1. To run external commands while editing a file in vim, use the '!' in the normal mode. For example
    :!ls -al
    will list the files
    :!date
    will display the current date.

  2. To read the output of external commands into the current file, do
    :r !date
    All the commands are run in normal mode. Press ESC key to enter the normal mode in vim.

    Further reading:- :help :!

  3. To run external commands in octave, use the system command. Sample octave session looks as
    $octave -q
    octave:1> system("date")
    Thu Jun 4 23:49:23 EDT 2009
    ans = 0
    octave:2> [ret_code output] = system("date");
    octave:3> ret_code
    ret_code = 0
    octave:4> output
    output = Thu Jun 4 23:49:40 EDT 2009

    octave:5> exit
    Further reading :- "doc system" shows the relevant help pages in octave.

  4. To run external commands in Fortran 90 programs, use the system command. Sample code looks as below
    $cat system.f90
    program callsystem
    implicit none
    !to examine the behaviour of the system command
    character (len=100)::cmd
    cmd="echo Wake up Neo"
    !if u are using ifc compiler use -Vaxlib during compilation
    call system(cmd//achar(0))
    call system(cmd)
    call system("date")
    ! The next line also works.
    ! call system("ls")
    end program callsystem

    $gfortran system.f90

    $./a.out
    Wake up Neo
    Wake up Neo
    Thu Jun 4 23:55:07 EDT 2009
  5. To run the external commands in C, use the system command available in stdlib.h. Sample code will be
    $cat system.c
    #include stdio.h
    #include stdlib.h

    int main() {
    /* Fixme :- <, > in the header files are not showing up on blogspot */
    int ret_code;
    ret_code = system("date");

    printf("%d\n", ret_code);
    return 0;
    }

    $gcc -Wall system.c

    $./a.out
    Fri Jun 5 00:04:14 EDT 2009
    0

    Further reading :- man system

    All the above are tested in Debian Lenny using vim 7.1, octave 3.0.1, gfortran 4.3.1, gcc 4.3.1

Thursday, April 23, 2009

file test operators in bash

Often while writing shell scripts, various tests need to be performed on files. For example, we need to check if a file exists before copying it somewhere. We need to check the existence of a directory before writing files into it.

Bash comes with the following list of operators to perform these tests.
Operator    Tests Whether
-e File exists
-f File is a regular file
-d File is a directory
-h File is a symbolic link
-L File is a symbolic link
-b File is a block device
-c File is a character device
-p File is a pipe
-S File is a socket
-t File is associated with a terminal

-N File was modified since last read
-O You own the file
-G Group id of the file is same as yours

-s File is not zero size

-r File has read permission
-w File has write permission
-x File has execute permission

-g sgid flag set
-u suid flag set
-k "sticky bit" set

F1 -nt F2 File F1 is newer than F2 *
F1 -ot F2 File F1 is older than F2 *
F1 -ef F2 Files F1 and F2 are hard links to the same file *


! NOT (inverts the sense of above tests)

* signifies a binary operator (requires two operands).


Reference :- Appendix B of "Advanced Bash-Scripting guide" by Mendel Cooper, Version 6.5. Debian users can get this document by installing the abs-guide package.
sudo apt-get install abs-guide

The necessary files can be found in /usr/share/doc/abs-guide . However, the abs-guide package contains only the html version of the document. A pdf version can be downloaded from http://www.tldp.org/LDP/abs/abs-guide.pdf .

Monday, March 30, 2009

script to get the external IP address

When a machine sits behind a router, it has two IP addresses. One internal (assigned by the router), one external (assigned by the ISP). To find the external IP address of the machine, I use the following script called ip.
$cat ip
#! /bin/sh

# get the external IP address of the machine
# Author : Kamraju Kusumanchi
# Date : Mon Mar 30 00:08:11 EDT 2009

curl www.whatismyip.org
echo ""
On my machine, I have
$curl --version
curl 7.18.2 (i486-pc-linux-gnu) libcurl/7.18.2 OpenSSL/0.9.8g zlib/1.2.3.3 libidn/0.6.5 libssh2/0.18
Protocols: tftp ftp telnet dict ldap ldaps http file https ftps scp sftp
Features: GSS-Negotiate IDN IPv6 Largefile NTLM SSL libz
Execution
$which ip
/home/rajulocal/bin/ip

$ip
141.153.242.115

Saturday, February 14, 2009

IP spoofing with iceweasel

This tutorial explains how to spoof the IP addresses using iceweasel (firefox) web browser on machines running Debian Linux.

  1. Install the Iceweasel browser, tor button extension
    $sudo apt-get install iceweasel iceweasel-torbutton
  2. Install the privoxy, tor packages
    $sudo apt-get install privoxy tor
  3. Configure privoxy by adding the following line to /etc/privoxy/config
    forward-socks4a / 127.0.0.1:9050 .
    Note the '.' at the end. It is important.

  4. Restart the privoxy
    $sudo /etc/init.d/privoxy restart
    Restarting filtering proxy server: privoxy.
  5. Restart the tor daemon
    $sudo /etc/init.d/tor restart
    Stopping tor daemon: tor.
    Raising maximum number of filedescriptors (ulimit -n) to 32768.
    Starting tor daemon: tor...
    Feb 14 00:14:49.473 [notice] Tor v0.2.0.30 (r15956). This is experimental software. Do not rely on it for strong anonymity. (Running on Linux i686)
    Feb 14 00:14:49.474 [notice] Initialized libevent version 1.3e using method epoll. Good.
    Feb 14 00:14:49.474 [notice] Opening Socks listener on 127.0.0.1:9050
    done.
  6. Start the iceweasel. Use ctrl+2 to enable tor. The status of the tor button is visible in the right bottom box of the iceweasel window. The screenshots below might be helpful.


    Note: ctrl+2 acts as a toggle switch to enable/disable tor.

  7. Change the proxy. Right click on the tor button (bottom right corner of iceweasel) -> choose preferences -> select "use custom proxy settings"


  8. Click on "Test Settings" then click "ok" to test for proxy settings. If everything went successful, there will be a confirmation.


  9. Check the new spoofed "IP address" by visiting sites such as www.whatismyip.com etc., This will be the IP address seen by the websites you visit.

    Tor has its limitations. It will not give complete anonymity but something good enough for most purposes. Use at your own risk.

The above tutorial is tested in Debian Lenny, iceweasel 3.0.5, tor 0.2.0.30, privoxy 3.0.9, torbutton 1.2.0.

Back ground story :- While hopping around the internet, I came across some articles which claim to track the "identity thefters" via the IP address hits to a website. This is a good approach but we have to understand that it has its own limitations. Using this article, I just wanted to point out that it is very easy to hide one's IP address tracks. Dont be misled by the IP hits...

Saturday, October 25, 2008

open a new gvim window from gvim

To open a new gvim window from an existing gvim window use

:silent !gvim

If there are any errors in the original window, the screen can be refreshed by

:redraw!

or by simply pressing ctrl-l.

For more help, see :!cmd, :silent in the vim help pages.

This tip was tested in vim 7.0 on a machine running Debian Etch.

Saturday, March 22, 2008

accessing wpa wireless networks

This article explains accessing a wireless connection with WPA TKIP encryption using a Dell Inspiron E1505 laptop running Debian Etch. The final network connection is going to look like

ISP <---> wrt54g router <---> Dell Inspiron E1505 laptop

where ISP is the Internet Service Provider such as roadrunner, comcast etc., (and in my case "clarity connect").

The main steps involved are
  1. configure the router
  2. Install the necessary software packages on the Debian machine
  3. encrypt the password (if necessary)
  4. add a network stanza in /etc/network/interfaces
  5. restart the network

The information about the wireless card can be found by using
sudo lspci --vv
In this case, we have
0b:00.0 Network controller: Intel Corporation PRO/Wireless 3945ABG Network Connection (rev 02)
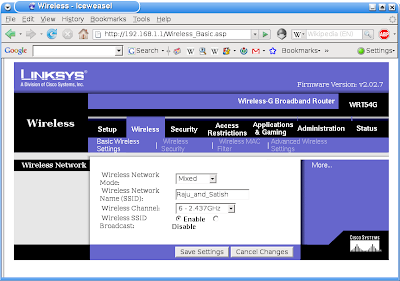
The router is configured as shown below.


The SSID stands for "Service Set Identifier". It is basically the name of the wireless network. In this example, it is set to "Raju_and_Satish". Change the SSID according to your network.

A list of available networks and their SSIDs can be obtained by using
iwlist scan

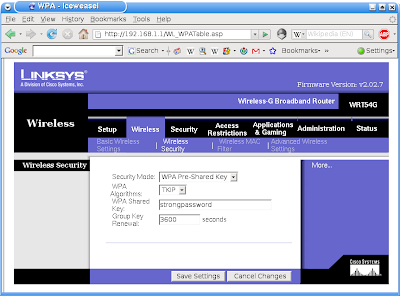
As can be seen from snapshot 2, the router is configured to use TKIP as its WPA encryption algorithm.

The "WPA Shared Key" (snapshot 2) is the place holder for setting a password to the network. Since the password is usually a bunch of ASCII characters, it is also referred as a "passphrase". In this example, the password for the network is "strongpassword". Change it according to your network.


Install the necessary software by using the apt-get command. I have installed
  • firmware-ipw3945
  • ipw3945-modules-2.6-686
  • ipw3945-modules-2.6.18-6-686
  • ipw3945d
  • wpasupplicant
I am not sure if all the above packages are needed for the network configuration, but I know that they are sufficient. If anyone knows a leaner version of the necessary packages, please let me know and I will update this list.


The next step is to generate an encrypted string known as the pre-shared key (PSK) from the ASCII password and the SSID. This can be achieved using the wpa_passphrase command.
$wpa_passphrase Raju_and_Satish strongpassword
network={
ssid="Raju_and_Satish"
#psk="strongpassword"
psk=604d8887badd597a8647f65b98c3c504ad29ba352211033adfed01cd8c3034a0
}

After this, add the following stanza to the /etc/network/interfaces.

# wireless setup
auto eth2
iface eth2 inet dhcp
wpa-conf managed
wpa-ssid Raju_and_Satish
wpa-key-mgmt WPA-PSK
wpa-psk 604d8887badd597a8647f65b98c3c504ad29ba352211033adfed01cd8c3034a0

Replace the wpa-ssid, wpa-psk with the values corresponding to your network configuration.

Then restart the network connections by doing
$sudo /etc/init.d/networking restart

Now the network should be up and running. Its status can be tested by using host, ping commands.

$host www.google.com
www.google.com CNAME www.l.google.com
www.l.google.com A 216.239.51.104
www.l.google.com A 216.239.51.99

$ping -c3 www.google.com
PING www.l.google.com (216.239.51.99) 56(84) bytes of data.
64 bytes from 216.239.51.99: icmp_seq=1 ttl=242 time=40.7 ms
64 bytes from 216.239.51.99: icmp_seq=2 ttl=242 time=40.9 ms
64 bytes from 216.239.51.99: icmp_seq=3 ttl=242 time=39.6 ms

--- www.l.google.com ping statistics ---
3 packets transmitted, 3 received, 0% packet loss, time 10124ms
rtt min/avg/max/mdev = 39.616/40.437/40.985/0.635 ms

Tuesday, February 26, 2008

weather in ithaca

To find the weather in Ithaca using a Linux box, add the following lines to the ~/.weatherrc . Use /etc/weatherrc for site-wide configuration.
$cat /home/rajulocal/.weatherrc
[default]
City = ITHACA
Forecast = True
ID = KITH
St = NY
After that you can get the current weather conditions and forecast by using the weather command.
$weather
Current conditions at Ithaca Tompkins Regional Airport (KITH)
Last updated Feb 26, 2008 - 05:56 PM EST / 2008.02.26 2256 UTC
Wind: from the WNW (300 degrees) at 3 MPH (3 KT)
Sky conditions: obscured
Weather: light snow; mist
Precipitation last hour: A trace
Temperature: 31.1 F (-0.5 C)
Relative Humidity: 95%
City Forecast for Ithaca, NY
Issued Tuesday afternoon - Feb 26, 2008
Tuesday night... Low 21, 100% chance of precipitation.
Wednesday... Snow showers, high 22, 80% chance of precipitation.
Wednesday night... Low 9, 40% chance of precipitation.
Thursday... Very cold, high 19.
Thursday night... Low 9.
Weather uses METAR data that it fetches from the the National Oceanic and Atmospheric Administration and forecasts from the National Weather Service. The list of weather stations and their codes can be obtained from http://www.rap.ucar.edu/weather/surface/stations.txt .

Tested on Debian Etch using
$weather --version
weather 1.2
Related links :-
  1. http://debaday.debian.net/2007/10/04/weather-check-weather-conditions-and-forecasts-on-the-command-line/
  2. http://www.rap.ucar.edu/weather/surface/stations.txt
  3. http://en.wikipedia.org/wiki/METAR

Thursday, November 22, 2007

browse gcc source code

To browse the source code of gcc use http://gcc.gnu.org/viewcvs/ . For example, to look at the contents of trunk/gcc/testsuite/gcc.c-torture/execute/ directory, just go to http://gcc.gnu.org/viewcvs/trunk/gcc/testsuite/gcc.c-torture/execute/ . Similarly, to view the contents of a particular file, say pr34130.c use http://gcc.gnu.org/viewcvs/trunk/gcc/testsuite/gcc.c-torture/execute/pr34130.c?revision=130258&view=markup

Situation:
Recently, a miscompilation bug has been discovered in gcc. It affects all the gcc versions from 3.3.6 to 4.2.2. This bug is fixed in 4.3.0 and a testcase trunk/gcc/testsuite/gcc.c-torture/execute/pr34130.c has been added to the testsuite so that the same problem does not arise in the future versions. I wanted to take a quick peek at this file but was not ready to download 1.2 gigabytes of gcc's svn repository just for this. The above tip came in handy under this scenario.

Alternate solutions:
1. If you are familiar with svn, it is possible to do
svn -q co svn://gcc.gnu.org/svn/gcc/trunk/gcc/testsuite/gcc.c-torture/execute execute
and download just the trunk/gcc/testsuite/gcc.c-torture/execute directory.

Related links :-
  • http://gcc.gnu.org/svn.html
  • http://gcc.gnu.org/bugzilla/show_bug.cgi?id=34130
  • http://bugs.debian.org/cgi-bin/bugreport.cgi?bug=452108

Followers