ISP <---> wrt54g router <---> Dell Inspiron E1505 laptop
where ISP is the Internet Service Provider such as roadrunner, comcast etc., (and in my case "clarity connect").
The main steps involved are
- configure the router
- Install the necessary software packages on the Debian machine
- encrypt the password (if necessary)
- add a network stanza in /etc/network/interfaces
- restart the network
The information about the wireless card can be found by using
sudo lspci --vvIn this case, we have
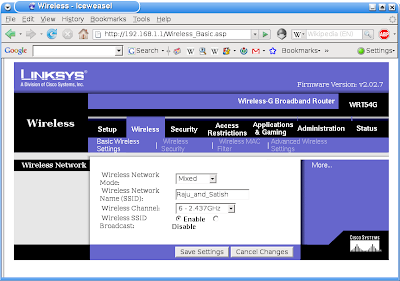
0b:00.0 Network controller: Intel Corporation PRO/Wireless 3945ABG Network Connection (rev 02)The router is configured as shown below.


The SSID stands for "Service Set Identifier". It is basically the name of the wireless network. In this example, it is set to "Raju_and_Satish". Change the SSID according to your network.
A list of available networks and their SSIDs can be obtained by using
iwlist scan
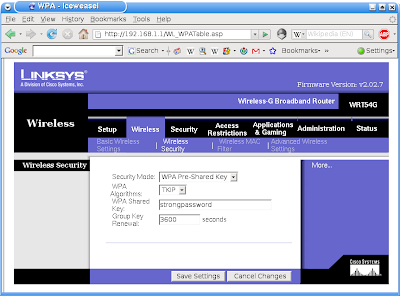
As can be seen from snapshot 2, the router is configured to use TKIP as its WPA encryption algorithm.
The "WPA Shared Key" (snapshot 2) is the place holder for setting a password to the network. Since the password is usually a bunch of ASCII characters, it is also referred as a "passphrase". In this example, the password for the network is "strongpassword". Change it according to your network.
Install the necessary software by using the apt-get command. I have installed
- firmware-ipw3945
- ipw3945-modules-2.6-686
- ipw3945-modules-2.6.18-6-686
- ipw3945d
- wpasupplicant
The next step is to generate an encrypted string known as the pre-shared key (PSK) from the ASCII password and the SSID. This can be achieved using the wpa_passphrase command.
$wpa_passphrase Raju_and_Satish strongpassword
network={
   ssid="Raju_and_Satish"
   #psk="strongpassword"
   psk=604d8887badd597a8647f65b98c3c504ad29ba352211033adfed01cd8c3034a0
}
After this, add the following stanza to the /etc/network/interfaces.
# wireless setup
auto eth2
iface eth2 inet dhcp
wpa-conf managed
wpa-ssid Raju_and_Satish
wpa-key-mgmt WPA-PSK
wpa-psk 604d8887badd597a8647f65b98c3c504ad29ba352211033adfed01cd8c3034a0
Replace the wpa-ssid, wpa-psk with the values corresponding to your network configuration.
Then restart the network connections by doing
$sudo /etc/init.d/networking restart
Now the network should be up and running. Its status can be tested by using host, ping commands.
$host www.google.com
www.google.com          CNAME   www.l.google.com
www.l.google.com        A       216.239.51.104
www.l.google.com        A       216.239.51.99

$ping -c3 www.google.com
PING www.l.google.com (216.239.51.99) 56(84) bytes of data.
64 bytes from 216.239.51.99: icmp_seq=1 ttl=242 time=40.7 ms
64 bytes from 216.239.51.99: icmp_seq=2 ttl=242 time=40.9 ms
64 bytes from 216.239.51.99: icmp_seq=3 ttl=242 time=39.6 ms

--- www.l.google.com ping statistics ---
3 packets transmitted, 3 received, 0% packet loss, time 10124ms
rtt min/avg/max/mdev = 39.616/40.437/40.985/0.635 ms